
How to Automate Dozens of Pinterest Pins in 5 Minutes with Claude Code

How to Automate Dozens of Pinterest Pins in 5 Minutes with Claude Code
From a WordPress blog to a fully scheduled Pinterest calendar.
 Ian Sorin
May 3, 2026
8 min read
Ian Sorin
May 3, 2026
8 min read
8 min read
Claude Code can do more than write code. It can generate visuals, build files, and automate repetitive tasks. Including Pinterest.
In this tutorial, I’ll show you how to go from a WordPress blog to a fully scheduled Pinterest content calendar, with custom pin visuals, in about 5 minutes of setup. No Canva, no paid scheduler, no manual work.
- Claude Code pulls your articles from WordPress via the REST API (titles, URLs, scores, images)
- It generates Pinterest-ready pin visuals (1000x1500px) using Python Pillow
- It uploads images to WordPress to get public URLs for Pinterest
- It builds a bulk-import CSV matching Pinterest’s exact format, with scheduling
- You import the CSV on Pinterest, and you’re done
Step 1: Pull Your Blog Articles
If your blog runs on WordPress, you have a built-in REST API. No plugin needed. You just need an Application Password (go to WordPress admin → Users → Profile → Application Passwords).
Give Claude Code this prompt:
Pull all my articles from my WordPress blog via the REST API.

Site: https://yourblog.com
User: your-email@gmail.com
App password: xxxx xxxx xxxx xxxx

Get articles from category ID [your category ID].
For each article, extract: title, URL, featured image URL, and the review score if there is one in the content (look for patterns like X/10).
Claude Code runs a curl call to /wp-json/wp/v2/posts, parses the JSON, and gives you a clean list like this:
1. Dior Sauvage - 7.5/10 - https://yourblog.com/dior-sauvage-review/
2. Creed Aventus - 8.0/10 - https://yourblog.com/creed-aventus-review/
3. Tom Ford Costa Azzurra - 5.6/10 - https://yourblog.com/tom-ford-review/
...
Step 2: Generate Pin Visuals
Pinterest recommends 1000 x 1500 pixels (2:3 ratio). Instead of opening Canva for each pin, Claude Code writes a Python script that generates all of them automatically.
Here’s the prompt:
Create Pinterest pin images (1000x1500px) for each of my blog articles.

Design:
- Dark background (#1e222b)
- Product/brand name in bold white at the top
- Catchy hook question in accent color below the title
- Review score in a color-coded circle (green for 8+, cyan for 7+, orange for below 7)
- Real product photo centered (find real product photos, not AI-generated)
- CTA banner at the bottom with my site logo and URL

My logo is at: [your logo URL]
My site URL: [your site URL]

Here is my article data:
[paste article list from Step 1]

Save each pin as pin_[article-name].png
Claude Code uses Python’s Pillow library (pre-installed) to generate each pin. It downloads real product photos, applies your template, and saves everything locally.
Example Results
Here are 3 pins generated automatically. Same template, different data, zero manual design:
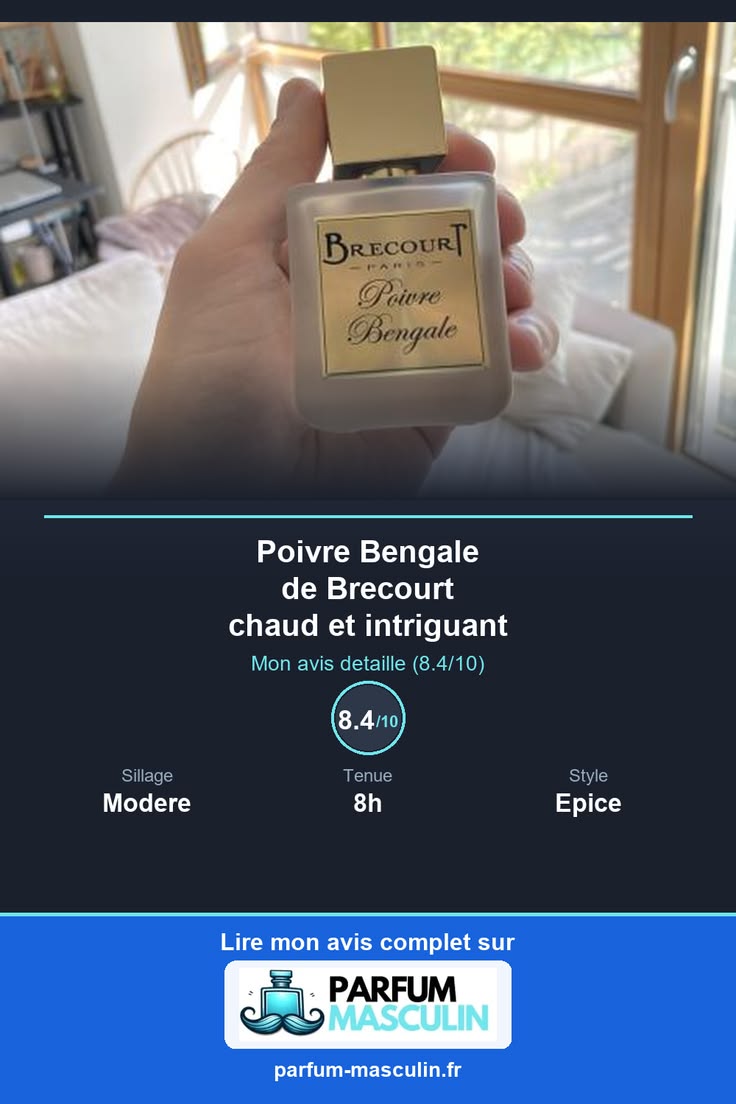
Real product photo + score + CTA
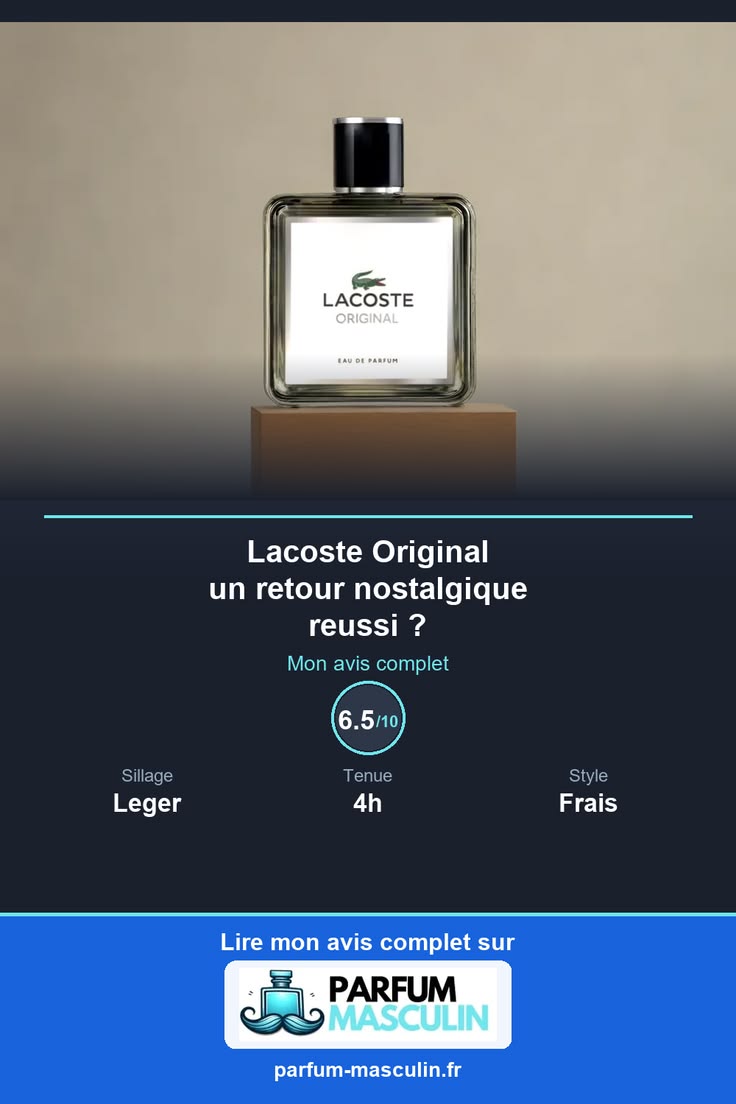
Same template, different data
This works for any niche. Change the background color, the accent colors, the layout, whatever fits your brand. The Python script is fully editable. Just tell Claude Code what you want changed and iterate until you’re happy with the design.
Step 3: Upload Images to Your WordPress
Pinterest’s CSV import needs a public URL for each pin image. The simplest solution: upload them to your WordPress media library. You already have a site, you already have the API.
Upload all the pin images you just generated to my WordPress media library.

Site: https://yourblog.com
User: your-email@gmail.com
App password: xxxx xxxx xxxx xxxx

Use the WordPress REST API media endpoint. After uploading, give me the list of public URLs for each pin.
Claude Code uploads each image via curl -F "file=@pin.png" .../wp-json/wp/v2/media and collects the public URLs. These URLs are what go into the Pinterest CSV.
Step 4: Build the Pinterest CSV
Pinterest supports bulk pin creation via CSV. The format has 7 columns:
Source: Pinterest official documentation on bulk CSV upload
- Leave Publish date empty to publish immediately upon import
- Set a future date (YYYY-MM-DD) to schedule pins in advance
- Want a specific publish time? Use the format
YYYY-MM-DDThh:mm:ss(UTC time). Example:2026-04-18T14:30:00publishes at 2:30 PM UTC - Multiple pins on the same date without a time will all publish at the time of import
- Claude Code can auto-calculate dates for you: just say “3 pins per day starting April 18” and it will distribute them
Here’s the prompt to generate the CSV:
Create a Pinterest bulk import CSV file.

Format: Title, Media URL, Pinterest board, Description, Link, Publish date, Keywords

Rules:
- Board name: "[Your Board Name]"
- Schedule 3 pins per day starting from [your start date]
- Date format: MM/DD/YYYY
- Write a unique description for each pin
- Each pin links to its blog article
- Include relevant keywords for each pin

Here are my pins with their image URLs:
[paste the list of articles + image URLs from previous steps]

Save it as pinterest_import.csv
Create your Pinterest board manually before importing. Pinterest won’t create it from the CSV. If the board name doesn’t match exactly, the import will fail with “Missing Pinterest board”.
CSV Template (Ready to Use)
Here’s a blank template you can copy or download, fill in your own data, or give directly to Claude Code:
Title,Media URL,Pinterest board,Description,Link,Publish date,Keywords
Your Pin Title,https://yourblog.com/wp-content/uploads/pin1.png,Your Board Name,"Your description here #hashtag1 #hashtag2",https://yourblog.com/your-article/,01/15/2026,"keyword1, keyword2"
Second Pin Title,https://yourblog.com/wp-content/uploads/pin2.png,Your Board Name,"Another description #hashtag1 #hashtag2",https://yourblog.com/second-article/,01/15/2026,"keyword1, keyword2"
Step 5: Import on Pinterest
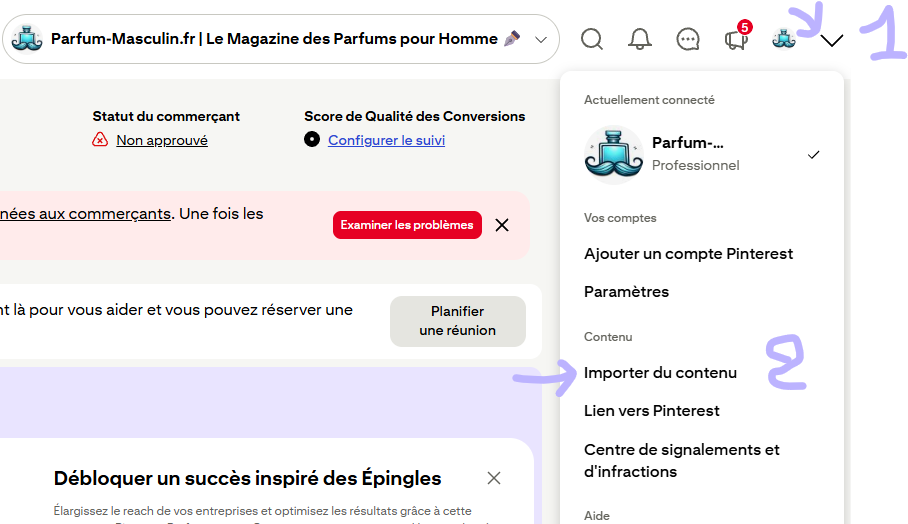
Once you have your CSV file ready, head to Pinterest. The import is a bit hidden in the interface, so here’s exactly where to go:
Click on your profile icon in the top right corner, then select “Import content” from the dropdown.
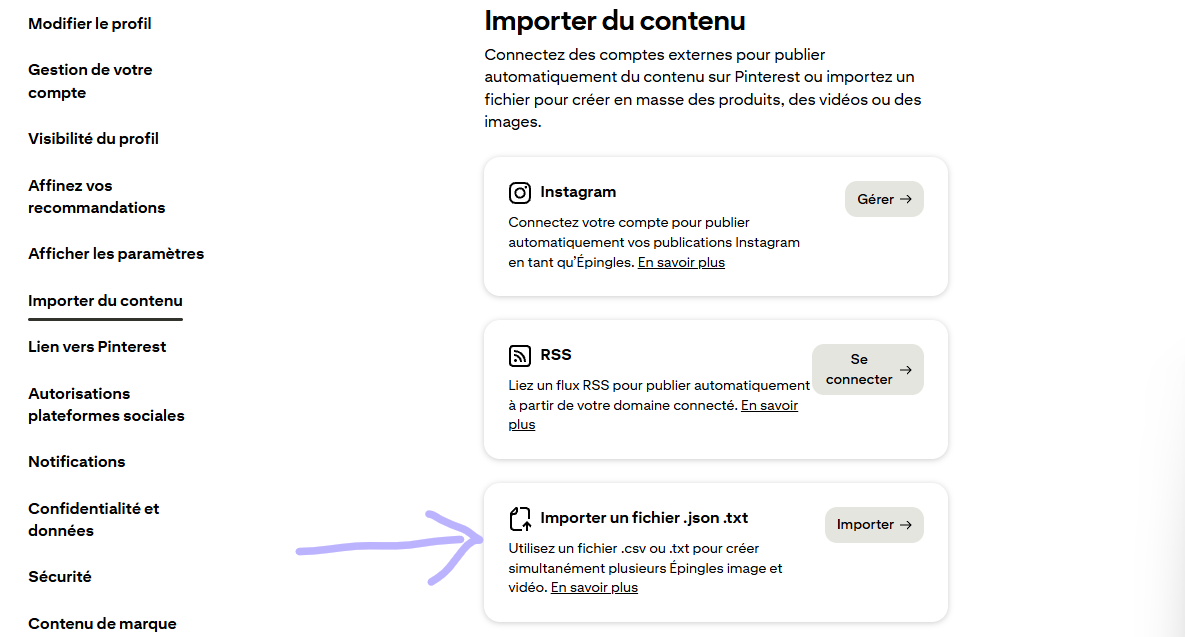
On the “Import content” page, scroll down to the third option: “Import a .json .txt file”. Despite the name, this is where you upload .csv files too. Click “Import”.
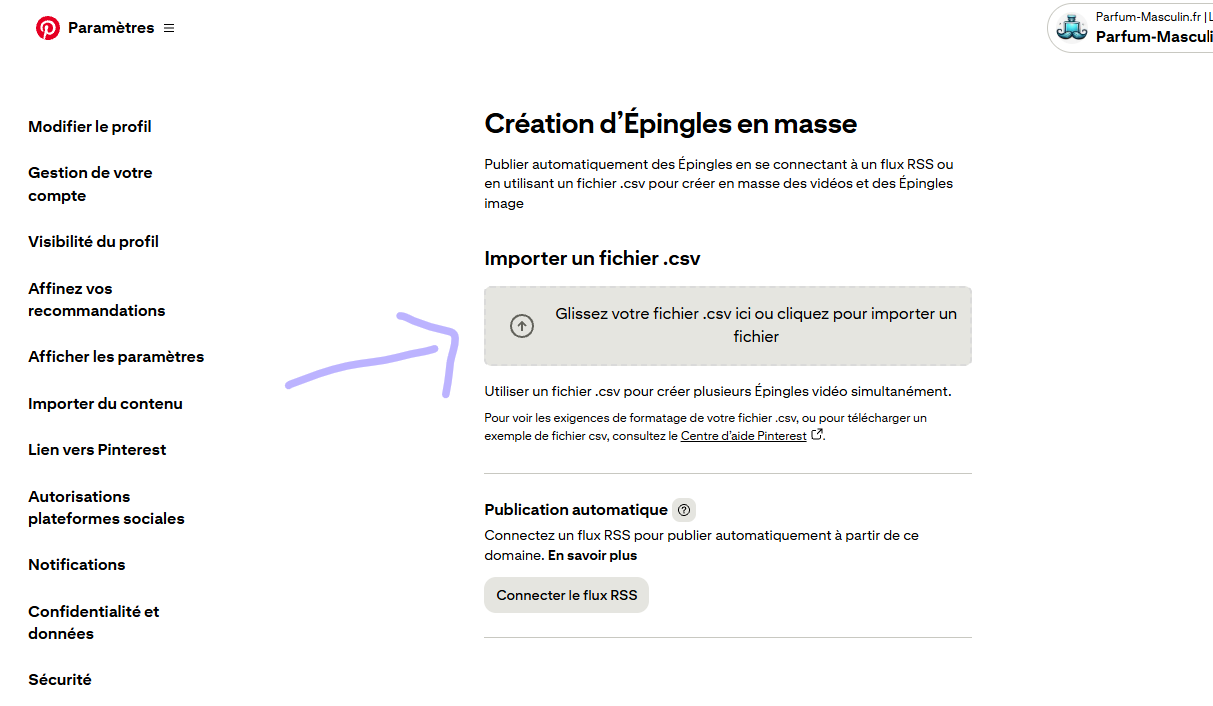
On the “Bulk pin creation” page, drag your CSV file into the upload zone, or click to browse your files.
What happens after you upload
Fair warning: the import confirmation is not very intuitive. After uploading your CSV, Pinterest doesn’t give you a big green “Success!” message. It can feel like nothing happened. Don’t worry. Here’s what to expect:
- Wait about 10 minutes for Pinterest to process your file and download all the images from your URLs
- If you set publish dates in the future: your pins will appear in your “Drafts and scheduled pins” section
- If you left the publish date empty: your pins will be published immediately and visible on your profile/board
- If there’s an error (wrong header, missing board), Pinterest shows the error right after upload. Fix the CSV and try again.
- “Missing header column” → The first row must match exactly:
Title,Media URL,Pinterest board,Description,Link,Publish date,Keywords - “Missing Pinterest board” → The board must already exist on your Pinterest account before importing
- Images not loading → Your image URLs must be publicly accessible (test in an incognito browser tab)
The All-in-One Prompt
Want to do the whole thing in one go? Give Claude Code this single prompt. Just fill in your own values:
I want to automate Pinterest pin creation for all my blog articles.

MY BLOG
- WordPress site: https://myblog.com
- API user: my-email@gmail.com
- App password: xxxx xxxx xxxx xxxx
- Category to pull: [category ID]

WHAT I NEED
1. Pull all articles from that category via the WordPress REST API (title, URL, score, featured image)
2. For each article, find a real product photo (not AI-generated)
3. Generate Pinterest pin images (1000x1500px) with:
   - Dark background
   - Product name in bold
   - Review score in a color-coded circle
   - Real product photo
   - CTA banner with my site logo + URL
4. Upload all pin images to my WordPress media library to get public URLs
5. Generate a Pinterest bulk import CSV with:
   - Unique descriptions for each pin
   - Links to each article
   - Scheduling: 3 pins per day starting [your start date]
   - Date format: MM/DD/YYYY

MY BRANDING
- Logo URL: [your logo URL]
- Site name: [your site name]
- Pinterest board name: [your board name] (already created on Pinterest)
Key Takeaways
Claude Code generates pin visuals with Python. Tell it what you want, iterate on the design, done.
All your article data is already structured and accessible. No manual copy-paste.
No Tailwind, no paid scheduler. Pinterest’s built-in bulk upload does the job.
Perfume reviews, recipes, tech, travel. Any blog with consistent articles can use this exact process.
The whole process takes about 20 minutes the first time. Once the template is set, adding new pins for future articles takes under 5 minutes.
That’s all for today. Bye!

Ian Sorin is an SEO consultant based in Lyon, France. With a deep passion for understanding how search engines work under the hood, he specializes in technical SEO and data-driven strategies.


